hexo美化(二)
教程出处
页脚计时器及徽标
效果:
- 在
G:\Blog打开Git Bash Here,输入如下命令:
1 | npm install hexo-butterfly-footer-beautify --save |
- 打开
G:\Blog\_config.butterfly.yml,添加以下代码:
1 | # footer_beautify |
- 设置页脚显示的文字内容和计数,在
G:\Blog\source\js下新建runtime.js,写入如下内容,可自行根据GPT自定制
1 | var now=new Date;function createtime(){now.setTime(now.getTime()+1e3);var e=new Date("08/01/2022 00:00:00"),t=Math.trunc(234e8+(now-e)/1e3*17),a=(t/1496e5).toFixed(6),o=new Date("08/09/2022 00:00:00"),n=(now-o)/1e3/60/60/24,r=Math.floor(n),i=(now-o)/1e3/60/60-24*r,s=Math.floor(i);1==String(s).length&&(s="0"+s);var d=(now-o)/1e3/60-1440*r-60*s,l=Math.floor(d);1==String(l).length&&(l="0"+l);var g=(now-o)/1e3-86400*r-3600*s-60*l,b=Math.round(g);1==String(b).length&&(b="0"+b);let c="";c=s<18&&s>=9?`<img class='boardsign' src='https://sourcebucket.s3.ladydaily.com/badge/F小屋-科研摸鱼中.svg' title='什么时候能够实现财富自由呀~'><br> <div style="font-size:13px;font-weight:bold">本站居然运行了 ${r} 天 ${s} 小时 ${l} 分 ${b} 秒 <i id="heartbeat" class='fas fa-heartbeat'></i> <br> 旅行者 1 号当前距离地球 ${t} 千米,约为 ${a} 个天文单位 🚀</div>`:`<img class='boardsign' src='https://sourcebucket.s3.ladydaily.com/badge/F小屋-下班休息啦.svg' title='下班了就该开开心心地玩耍~'><br> <div style="font-size:13px;font-weight:bold">本站居然运行了 ${r} 天 ${s} 小时 ${l} 分 ${b} 秒 <i id="heartbeat" class='fas fa-heartbeat'></i> <br> 旅行者 1 号当前距离地球 ${t} 千米,约为 ${a} 个天文单位 🚀</div>`,document.getElementById("workboard")&&(document.getElementById("workboard").innerHTML=c)}setInterval((()=>{createtime()}),1e3); |
文章双侧栏
效果:本来blog显示文章是单列的,改为双侧栏之后效果如下

下载插件
1
npm i hexo-butterfly-article-double-row --save
在网站配置文件
G:\Blog\_config.yml(注:不是主题配置文件!!)下添加如下配置:
1 | # 文章双栏布局 |
- hexo三连
补充
这时候插件有个bug,就是最后一页文章数目为奇数的时候,会出现翻页按钮出现在最右边,看着很不顺眼,直接把他设为居中,在G:\hexo\source\css\custom.css中添加如下代码:
1 | /* 翻页按钮居中 */ |
雪花飘落特效
前言:以前在WordPress也用js实现过雪花飘落的特效,但是对服务器性能要求蛮高的,容易出现卡顿,现在这个js好一点,要求不那么高,毕竟是静态博客
效果:在网页飘雪,动态,但是没有以前WordPress那个脚本那么好,那个是会跟着屏幕从最上面掉落在最下面,现在这个只能在屏幕下
- 新建js文件
G:\Blog\source\js\snow.js,写入如下内容
1 | if ( |
- 在
G:\Blog\source\css\custom.css添加如下css代码
1 | /* 雪花特效 */ |
- 引入画布元素,在
G:\Blog\_config.butterfly.yml中进行如下配置
1 | inject: |
- hexo三连即可看到效果,
只在白天模式显示,夜晚模式有流星特效和星光特效了
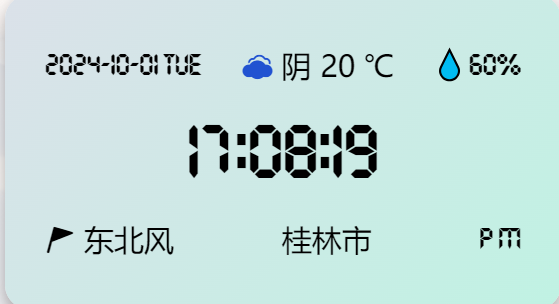
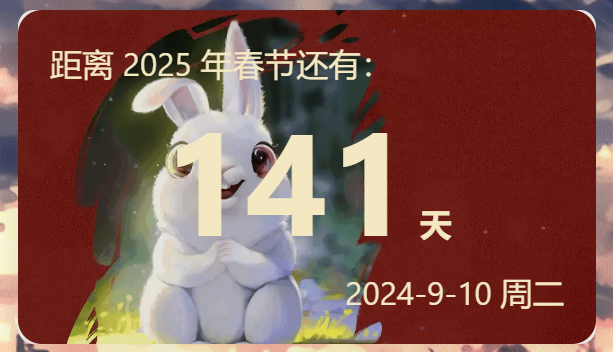
侧边栏新年倒计时(Leonus)
效果:添加一个侧边新年倒计时卡片
- 新建文件
G:\Blog\source\_data\widget.yml,写入如下内容,具体含义可以看butterfly官方文档
1 | # top: 创建的 widget 会出现在非 sticky 区域(即所有页面都会显示) |
- 添加如下css代码
1 |
|
- 新建js文件
G:\Blog\source\js\newYear.js,写入如下内容
1 | let newYearTimer = null; |
- 下载
jquery-3.6.3.min.js到本地并放入G:\Blog\source\js\jquery-3.6.3.min.js,因为之前配置访客欢迎信息时引入了,jquery-3.6.1.min.js,但是现在用3.6.3更高版本替代了,使用在配置文件中把之前引入的3.6.1注销掉,直接使用3.6.3版本的不能注释掉jquery-3.6.1.min.js!!!,可以不使用jquery-3.6.3.min.js,但是一定要有jquery-3.6.1.min.js,否则访客欢迎页面就会加载不出欢迎信息。 - 在
G:\Blog\_config.butterfly.yml引入依赖文件
1 | inject: |
- hexo三连重启项目
参考教程 博客新年倒计时卡片
字体更换
效果:替换网站的默认字体,让中文和代码使用不同的字体
中文字体:鸿蒙字体(粗体)
其他不错的字体
说明:支持多重字体格式(ttf、otf、woff、woff2、eot…),但是最推荐用.woff2的,因为它能提供更高的压缩率,比woff更小,加载速度更快
- 在
G:\Blog\source\css\custom.css添加如下代码
1 | /* 文章字体 */ |
新建文件夹
G:\Blog\source\font,将下载的字体放入文件夹下,我使用的中文字体是hm-m.woff2,代码字体为JetBrainsMono-Regular.woff2在
G:\Blog\_config.butterfly.yml中配置font
1 | font: |
- hexo三连
直达底部按钮
效果:在页面右下角添加一个直达底部的按钮
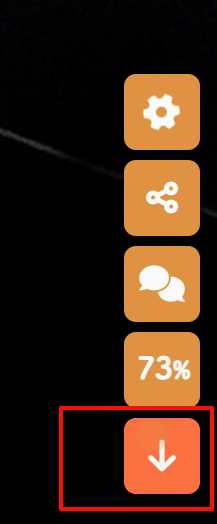
- 打开
G:\Blog\themes\butterfly\layout\includes\rightside.pug,添加如下内容
1 | button#go-up(type="button" title=_p("rightside.back_to_top")) |
宽屏适配
效果:改变博客全局宽度和侧边栏宽度
夸张效果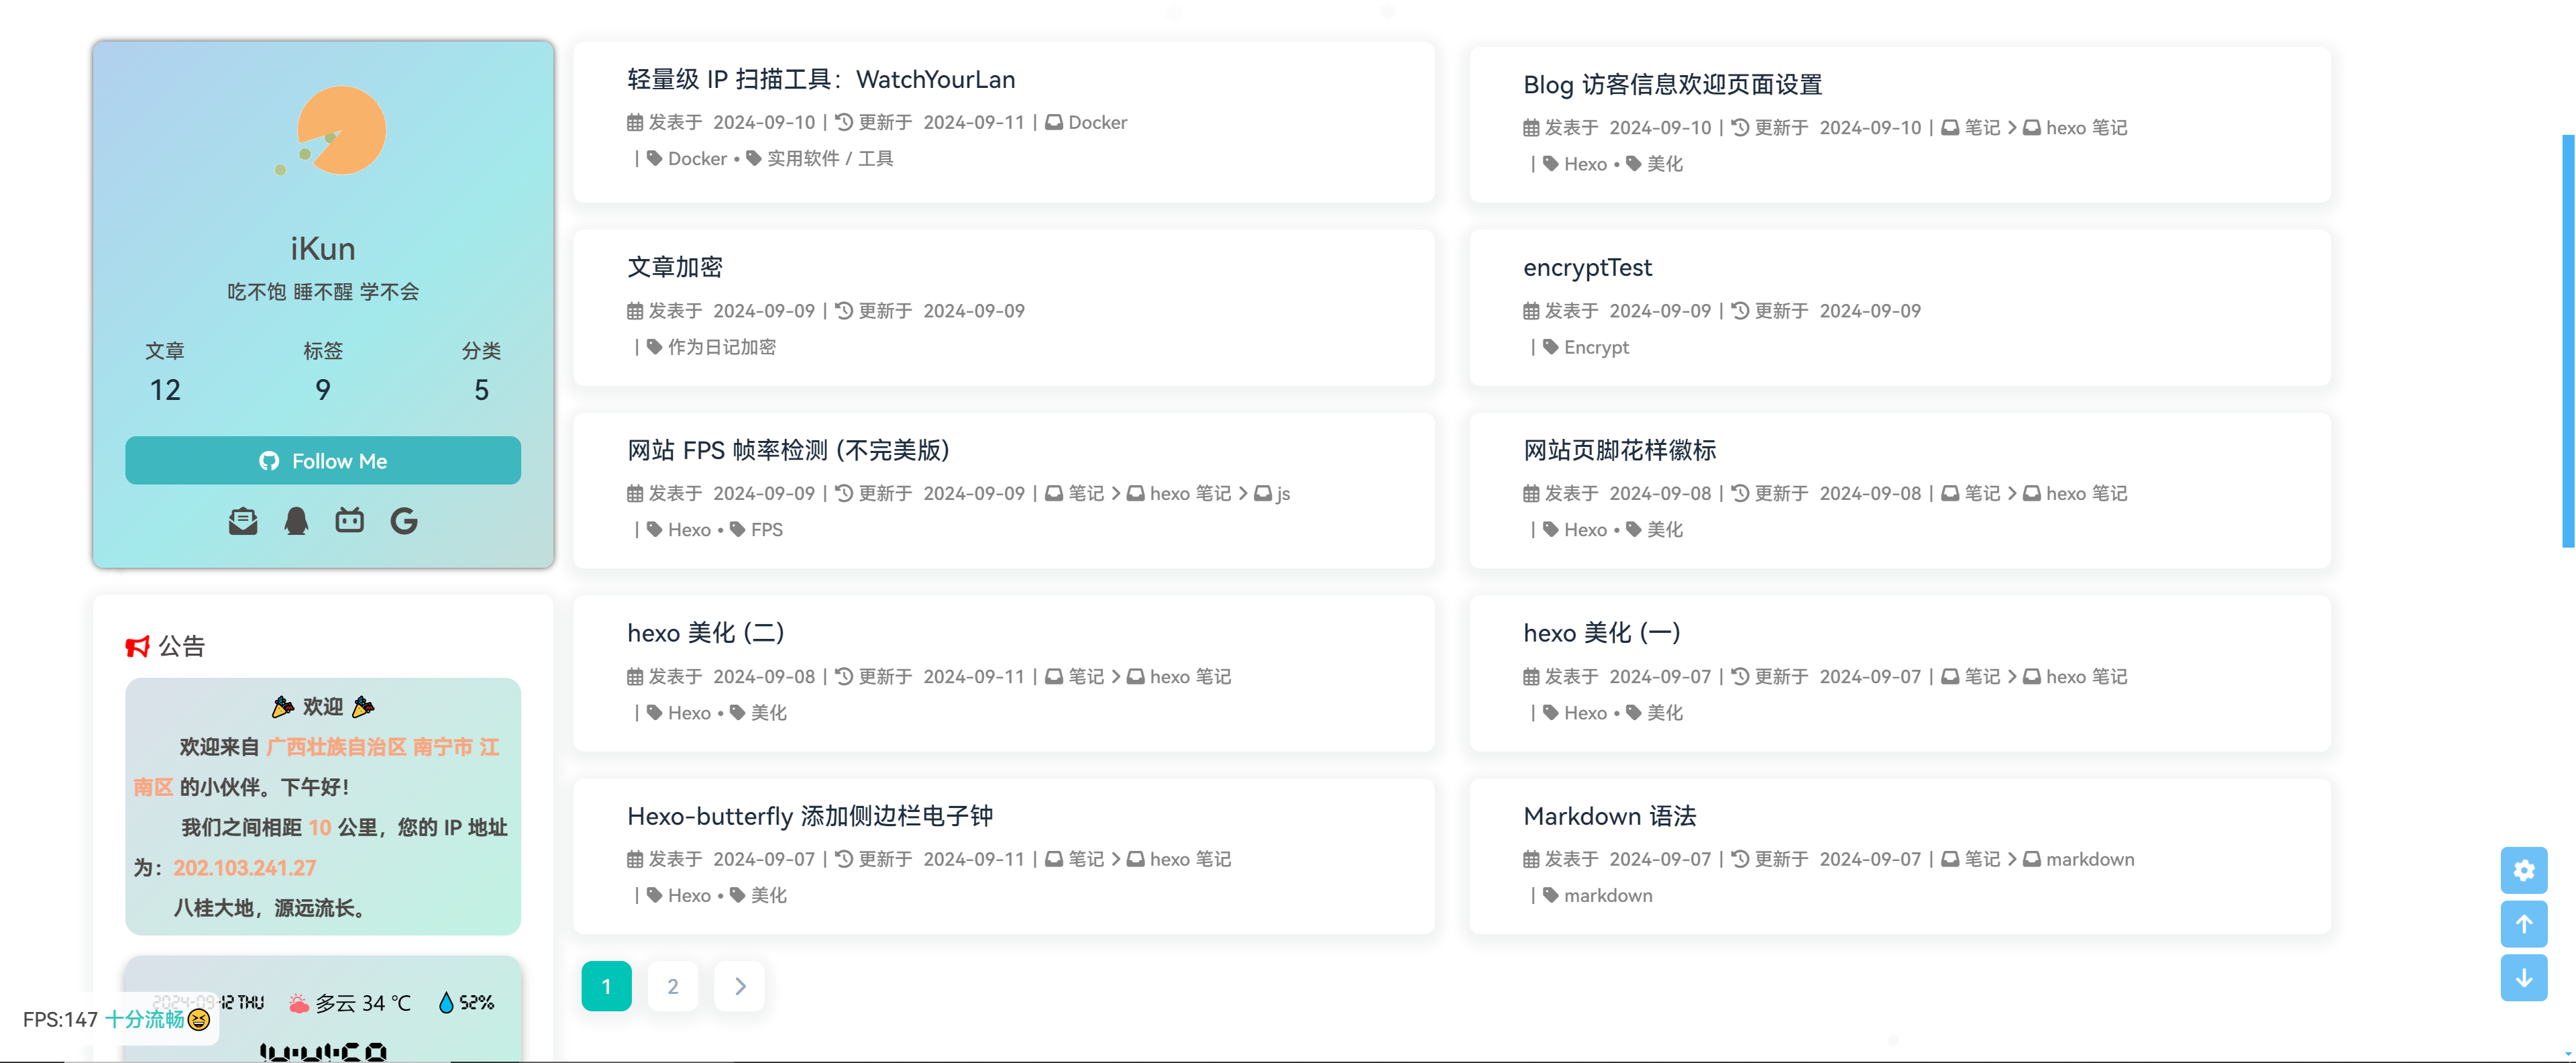
当前效果(距离屏幕左右两边宽度明显变化)
- 在
custom.css中添加如下代码
1 | /* 全局宽度 */ |
- 重启项目,hexo三连
给卡片添加动画
效果
给给类卡片添加出场动画,原来是打开页面就存在,现在有一个入场方式
参考
动画网站
这个网站有很多动画,可以选自己喜欢的 动画网站
操作步骤
- 安装插件,
1 | npm install hexo-butterfly-wowjs --save |
- 在
G:\Blog\_config.butterfly.yml配置文件添加如下内容
1 |
|
打开
G:\Blog\themes\butterfly\layout\includes\widget\card_author.pug文件夹,给Follow Me添加类名因为插件
只能根据类名class添加动画,不支持根据id添加动画,所以要给一些只有id没有class的容器添加class,在pug中可以通过这种方式为同一个元素同时指定id和class,#footer-wrap代表id="footer-wrap",.footer-wrap代表class="footer-wrap"
1 |
|
- 打开
G:\Blog\themes\butterfly\layout\includes\footer.pug,给id为footer.pug的元素添加类名(第二行)
1 | //- #footer-wrap |
参数释义
| 参数 | 备选值 | 释义 |
|---|---|---|
| enable | true/false | 【必选】控制开关 |
| priority | number | 【可选】过滤器优先级,数值越小,执行越早,默认为10,选填 |
| mobile | true/false | 控制移动端是否启用,默认移动端禁用 |
| animateitem.class | class | 【可选】添加动画类名,只支持给class添加 |
| animateitem.style | text | 【可选】动画样式,具体类型参考animate.css |
| animateitem.duration | time,单位为s或ms | 【可选】动画持续时间,单位可以是ms也可以是s。例如3s,700ms。 |
| animateitem.delay | time,单位为s或ms | 【可选】动画开始的延迟时间,单位可以是ms也可以是s。例如3s,700ms。 |
| animateitem.offset | number,单位为px | 【可选】开始动画的距离(相对浏览器底部)。 |
| animateitem.iteration | number,单位为s或ms | 【可选】动画重复的次数 |
| animate_css | URL | 【可选】animate.css的CDN链接,默认为https://npm.elemecdn.com/hexo-butterfly-wowjs/lib/animate.min.css |
| wow_js | URL | 【可选】wow.min.js的CDN链接,默认为https://npm.elemecdn.com/hexo-butterfly-wowjs/lib/wow.min.js |
| wow_init_js | URL | 【可选】wow_init.js的CDN链接,默认为https://npm.elemecdn.com/hexo-butterfly-wowjs/lib/wow_init.js |
hexo博客如何迁移到新电脑
参考教程 Hexo博客如何迁移到新电脑
+++
Vue+Element样式弹窗(不要下载引用的文件到本地!)
效果:
- 在
G:\Blog\_config.butterfly.yml引入Vue和Element相关依赖,未下载js文件到本地版
1 | # 未下载js文件到本地 |
已下载文件到本地,并将css文件和js文件分别放入不要将文件下载到本地然后使用相对路径的方法引用,否则控制台会/css和/js文件夹中,将原来的index.css重命名为vueindex.css,将index.js重命名为vueindex.jsUncaught ReferenceError: Vue is not defined at HTMLDocument.<anonymous> (copyPrompt.js:2:3)的错误
新建js文件
G:\Blog\source\js\copy.js,写入如下内容,仅在复制和打开F12时弹出提醒在想要弹出弹窗的js代码中加入
new Vue({})即可触发弹窗:
1 | document.addEventListener("copy", function () { |
参数释义
| 参数 | 释义 |
|---|---|
| notify | 弹窗类型,可以替换为message(信息提示)和confirm(二次确认提示) |
| title | 弹窗标题,可以改为自定义标题 |
| message | 弹窗信息,可以改为自定义内容 |
| position | 弹出位置,bottom、top和left、right两两组合 |
| offset | 偏移量,简单可以理解为与边界的距离 |
| showClose | 是否显示关闭按钮 |
| type | 提示类型,可选success/warning/info/error等 |
| duration | 停留时间,弹出停留至消失的时间,单位ms |
页面样式调节
效果:通过css样式调节各个页面透明度、模糊度(亚克力效果)、圆角、边框样式等,看起来会更加舒适。

- 复制一下代码到自定义的
G:\hexo\source\css\custom.css文件
1 | :root { |
- 把上面代码的
:root设置移动到G:\hexo\source\css\custom.css最前面,因为下面的样式要引用它,所在放在最前
1 | :root { |
参数说明
--trans-light:白天模式带透明度的背景色,如rgba(255, 255, 255, 0.88)底色是纯白色,其中0.88就透明度,在0-1之间调节,值越大越不透明;--trans-dark: 夜间模式带透明度的背景色,如rgba(25, 25, 25, 0.88)底色是柔和黑色,其中0.88就透明度,在0-1之间调节,值越大越不透明;--border-style: 边框样式,1px solid rgb(169, 169, 169)指宽度为1px的灰色实体边框;--backdrop-filter: 背景过滤器,如blur(5px) saturate(150%)表示饱和度为150%的、高斯模糊半径为5px的过滤器,这是亚克力效果的一种实现方法; 消耗性能较高,未开启
版权渐变色美化
效果:修改文章版权卡片的样式,添加渐变色和文字排布信息
- 打开
G:\hexo\themes\butterfly\layout\includes\post\post-copyright.pug,复制如下代码替换原文件(我把上面的源代码注释掉了,没有删掉)
1 | if theme.post_copyright.enable && page.copyright !== false |
- 打开
G:\hexo\themes\butterfly\source\css\_layout\post.styl,用以下代码覆盖掉源代码。这个文件就是自己调节样式的。其中,184行是白天模式的背景色;253行是夜间模式的发光光圈颜色,也可以自行替换成自己喜欢的颜色:
1 | beautify() |
网页底部运行时间
效果:添加一个网站运行时间

- 新建
source\css\bottom_runtime.css,写入如下内容
1 | div#runtime { |
- 新建
source\js\bottom_runtime.js,写入如下内容
1 | setInterval(() => { |
- 在主题配置文件
_config.butterfly.yml的footer:修改内容
1 | footer: |
- 在主题配置文件
_config.butterfly.yml引入css和js文件
1 | inject: |
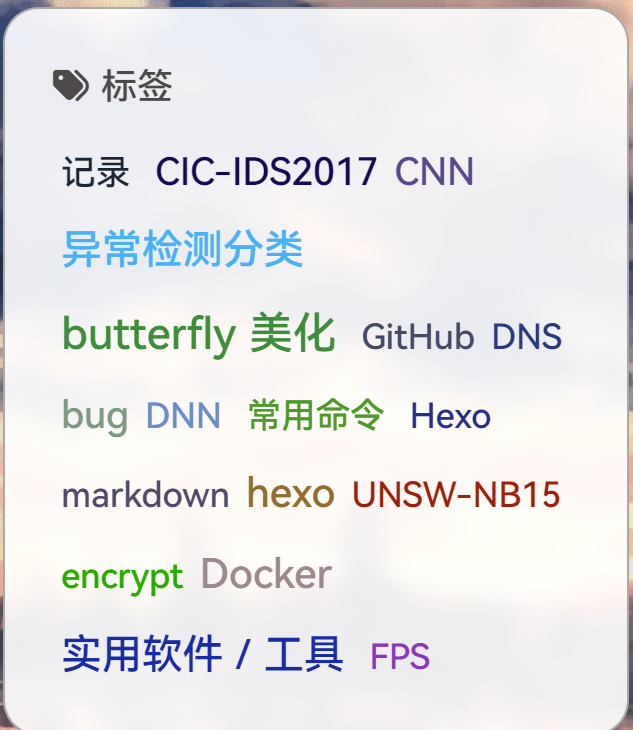
博客标签魔改
效果:
- 让字体显示统一大小
- 让标签让大小顺序排序

- 打开
themes\butterfly\scripts\helpers\page.js,注释掉以下代码
1 | // hexo.extend.helper.register('cloudTags', function (options = {}) { |
- 在注释代码下面添加如下代码
1 | hexo.extend.helper.register("cloudTags", function (options = {}) { |
- 在
G:\hexo\source\css\custom.css文件最下面写入如下代码
1 | /* 标签 */ |